Aluminum’s lightweight strength and gleaming finish make it a favorite—from cookware and hardware to intricate aesthetic pieces. But that signature aluminum oxide layer, which protects the metal, also makes it vulnerable to misuse. Ultrasonic cleaners promise a thorough cleanse with minimal effort, yet aluminum by nature warrants careful attention when submerged in cavitation sessions. To avoid dulling or damaging, it’s vital to calibrate your cleaning choices with insight and precision.
Understanding Ultrasonic Cavitation and Aluminum
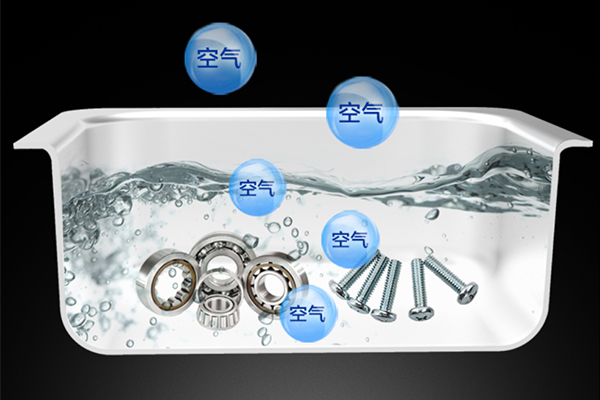
At its core, ultrasonic cleaning uses high-frequency sound to generate countless microbubbles in a liquid. Those bubbles collapse near surfaces, releasing tiny shock waves that shake off contaminants. For many metals, this is a gentle yet effective method. But aluminum’s softness and its passive oxide coating change the equation. Harsh cavitation or aggressive solutions can erode the oxide and expose raw metal, risking corrosion over time.
Ultrasonic cavitation works by sending high-frequency sound waves through a liquid medium, producing microscopic vacuum bubbles that collapse with force. These implosions release kinetic energy capable of dislodging contaminants. Aluminum, however, is a relatively soft and reactive metal. During ultrasonic cavitation, localized heating and physical abrasion can potentially alter the aluminum’s finish—especially on uncoated or unalloyed forms. Certain grades of aluminum, particularly anodized or hard-coated variants, fare better under cavitation than raw or polished surfaces. Understanding this interplay between bubble energy and aluminum’s metallurgy is key to avoiding pitting or surface dulling during ultrasonic cleaning.

When Ultrasonic Cleaning Works—and When It Doesn’t
Aluminum parts with simple dirt or non-adhered grease can benefit from short ultrasonic cycles (under 5 minutes), using mild, pH-neutral solutions. On the flip side, forged or anodized aluminum—especially those with cosmetic finishes—should be off-limits. Those surfaces often contain dye or delicate textures; even brief cavitation can erode color or create micro-pitting, which dulls appearance.
Ultrasonic cleaning can work well for aluminum components with heavy grease, carbon buildup, or embedded particulates—common in automotive, aerospace, or mechanical applications. In these contexts, ultrasonic agitation can reach crevices where manual cleaning fails. However, it’s not always appropriate. Thin aluminum foils, delicate jewelry, or decorative aluminum trims can be damaged or discolored due to prolonged exposure. Likewise, using aggressive detergents or high temperatures (above 60°C) exacerbates risks. The golden rule is: always test with lower power and shorter cycles, and observe the reaction. For irreplaceable parts, manual techniques or gentler methods should take priority.
Smart Cleaning Workflow for Aluminum
Use soft, neutral solutions: Avoid acids or ammonia; a few drops of mild dish detergent in distilled water will usually do the trick.
Keep it gentle: Opt for 40 kHz frequency and low power. Cycle time should never exceed 5 minutes per session.
Protect the finish: For polished trays or visual hardware, drop the part in a mesh basket—never let it touch the tank walls directly.
Rinse thoroughly: Deionized water rinse after ultrasonic cleaning removes residues, then towel-dry gently.
Beyond Ultrasonic—Care Tips for Long-Term Use
Sometimes a warm soak and soft brush are just as effective—and safer. Rub gently with microfiber and untreated soap, rinse, and dry. A light polish with a non-abrasive paste can restore shine without risking surface erosion. Store aluminum in low-humidity conditions, and avoid stacking items to prevent scratches.
For long-term care of aluminum items—especially cookware, machine parts, and tools—adopt a balanced routine that includes gentle pre-rinsing, using soft brushes, and avoiding acidic or alkaline solutions unless verified safe. After ultrasonic cleaning, dry aluminum immediately to prevent oxidation. Applying a light film of protective oil or corrosion inhibitor helps maintain luster and prevent environmental degradation. Storage conditions matter too: avoid stacking bare aluminum parts, and keep them in dry, temperature-stable environments. When in doubt, consult with material-specific guides or product manuals to understand aluminum’s finish and optimal handling.
Recommended Fluid Choices
Stick with neutral, mild detergents—stay away from acidic or caustic cleaners. For stubborn oily residues, enzyme-based cleaners (non-corrosive to aluminum) can help. Always read the ultrasonic machine’s compatibility specs and adjust solution strength accordingly.
Using the correct fluid inside the ultrasonic cleaner is critical when cleaning aluminum. Neutral-pH solutions are generally recommended—these include water-based detergents specifically formulated for non-ferrous metals. Avoid ammonia, bleach, or acidic descalers, which can corrode aluminum or leave dull spots. If unsure, select cleaners labeled as “aluminum-safe.” Adding a corrosion inhibitor can enhance safety. Always mix the solution according to the manufacturer’s dilution guidelines and conduct a spot test when cleaning delicate or anodized parts.
Final Take
Ultrasonic cleaning isn’t off-limits for aluminum—but only when used thoughtfully. Match the intensity, solution, and duration to the material’s durability. Light cycles with mild fluid and a protective basket can restore shine without harm. Always test on a less-visible area first. When in doubt, bring in manual techniques or gentle polishing. Respecting aluminum’s finesse ensures both beauty and longevity.
Aluminum and ultrasonic cleaning can work well together—if used with care. The technology offers depth, precision, and consistency, especially for parts that are hard to reach manually. But aluminum’s softness and reactive properties demand respect. If you approach ultrasonic cleaning as a surgical instrument rather than a brute-force tool, you’ll be rewarded with sparkling results without sacrifice. The right equipment, fluid, and mindset make all the difference. When in doubt, choose the gentler setting and observe results incrementally. In precision cleaning, patience always trumps speed.