If you have ever looked at your ultrasonic cleaner and thought, “Vinegar cleans my coffee machine and windows — could it also make my ultrasonic cleaning even better?”, you are not alone. It is a common question, especially among people who prefer household, low-cost cleaning solutions over specialized commercial fluids. Vinegar, with its sharp scent and acidic bite, seems like it could cut through grime with ease. But when ultrasonic cleaning is involved, the story becomes more nuanced than simply pouring a splash into the tank.
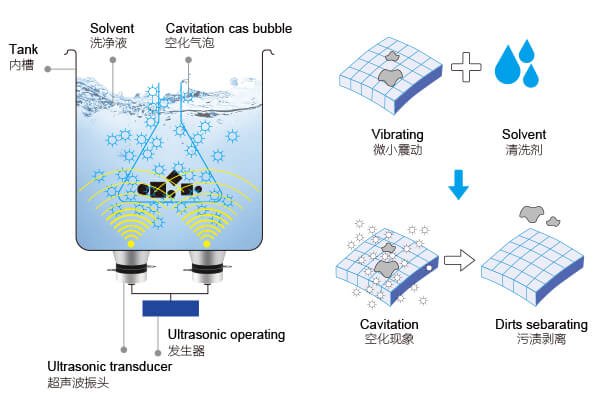
Ultrasonic cleaners work by generating high-frequency sound waves that create microscopic cavitation bubbles in a liquid. When these bubbles collapse, they release a powerful scrubbing force that can reach into tiny crevices and complex surfaces — the very reason they are popular for cleaning jewelry, dental tools, lab equipment, and precision mechanical parts. The liquid in the tank is not just a passive medium; its chemical properties directly affect how cavitation behaves and how effectively dirt is removed. So, when we introduce vinegar — essentially a diluted solution of acetic acid — we are changing both the chemistry of the cleaning fluid and potentially the physical conditions under which the cleaner operates.
On the surface, vinegar’s appeal is understandable. It is inexpensive, widely available, and has well-documented cleaning abilities for mineral deposits, soap scum, and certain organic residues. Its acidity helps dissolve calcium carbonate, limescale, and other alkaline-based deposits that water alone cannot handle. This makes it a natural favorite for tasks like descaling kettles or brightening glassware. However, the same acidity that gives vinegar its cleaning power can also be its biggest drawback in an ultrasonic cleaner.
Here is why: ultrasonic cleaners often have tanks made from stainless steel. While stainless steel is resistant to corrosion under normal conditions, prolonged contact with strong acids — even weak acids like vinegar — can slowly attack the protective chromium oxide layer on the surface. Over time, this can lead to pitting or micro-corrosion in the tank. And unlike a kettle, where you can easily replace the container, the tank in an ultrasonic cleaner is integral to the machine. Once damaged, repairs are costly or impossible.
There is also the issue of the items you are cleaning. Many metals, such as aluminum, brass, and some plated finishes, react poorly to acidic solutions. Even short exposure to vinegar can cause discoloration or surface etching. For delicate items, especially those with coatings, glued parts, or porous materials like natural stone, vinegar can be particularly risky. Imagine putting a mother-of-pearl necklace in vinegar and finding the surface dulled or the glue weakened — it is not a pleasant surprise.
Another less obvious concern is the effect of vinegar on cavitation efficiency. Cavitation depends on factors like liquid viscosity, surface tension, and vapor pressure. Acids, even in mild concentrations, can alter these properties. While in some cases this may slightly improve cleaning action, it can also make bubble collapse less predictable, which in turn can influence the precision of cleaning. In specialized applications like dental or laboratory cleaning, where the goal is not only cleanliness but also maintaining structural integrity, these changes matter.
That is not to say vinegar has no place at all in ultrasonic cleaning. Some professionals use diluted vinegar solutions for very specific purposes, such as removing light oxidation from brass cartridge cases in the reloading community, or cleaning certain glass apparatuses. However, in most of these cases, the vinegar is heavily diluted, the exposure time is kept extremely short, and the solution is promptly rinsed away to prevent ongoing chemical action after the ultrasonic cycle ends. The key word here is controlled.
If you think about ultrasonic cleaning like cooking, vinegar is more of a seasoning than a staple ingredient — a little in the right situation can work wonders, but dumping it in without thought can ruin the dish. Using vinegar without understanding how it interacts with your ultrasonic cleaner and the items you are cleaning is like adding salt without tasting first — you risk overdoing it.
Understanding How Vinegar Behaves in an Ultrasonic Environment
To understand whether vinegar belongs in your ultrasonic cleaner, we first need to understand the chemistry behind it. Vinegar is typically a solution of about 4–8% acetic acid in water, with trace minerals and organic compounds depending on the source (white distilled vinegar, apple cider vinegar, wine vinegar, etc.). Acetic acid is a weak acid, but it is still capable of reacting with certain metals and mineral deposits.
When you pour vinegar into an ultrasonic tank, two processes happen at once:
- Cavitation-driven mechanical cleaning – High-frequency sound waves (commonly 40 kHz in household cleaners) create rapid pressure changes, forming tiny vapor bubbles. These bubbles collapse with immense localized energy, physically loosening dirt, grease, and deposits from surfaces.
- Chemical dissolution – The acidity of vinegar reacts with alkaline substances such as limescale, rust oxides, or tarnish, breaking them down at the molecular level.
The interplay between these two effects can be beneficial, but it can also amplify undesirable outcomes. Ultrasonic cavitation accelerates chemical penetration into surface layers — meaning vinegar can attack not just the grime but also the base material if it is vulnerable.
The pH Factor and Metal Corrosion
Vinegar has a pH of about 2.4 to 3.4 depending on concentration. In corrosion science, any solution below pH 4 is considered acidic enough to pose a risk to susceptible metals. While stainless steel is generally resistant, the repeated mechanical agitation from cavitation can disrupt its passive layer, allowing acid to reach raw metal underneath. Over weeks or months of repeated use, this can create tiny pits that harbor dirt and bacteria, undermining the cleaner’s hygiene performance and potentially shortening its lifespan.
For softer metals, the risks are even greater:
- Aluminum – Highly reactive with acids, forms aluminum acetate, leading to dulling and pitting.
- Brass – Composed of copper and zinc, both of which can leach into acidic solutions, causing pinkish or reddish discoloration.
- Copper – Quickly tarnishes or darkens in vinegar, and prolonged exposure can etch the surface.
- Plated metals – Acid can lift thin plating layers, exposing the base metal underneath.
A notable study by the ASM International corrosion database documents that mild acids like acetic acid cause measurable metal loss over time, especially under agitation. This makes ultrasonic environments particularly aggressive because cavitation keeps replenishing the acid at the metal interface.
Effects on Non-Metal Materials
It’s not just metals you need to worry about. Vinegar can damage or degrade:
- Natural stones (e.g., marble, onyx, malachite) – These are calcium carbonate-based and dissolve in acids, leading to irreversible surface erosion.
- Adhesives – Many jewelry items use glue for setting stones; vinegar can weaken these bonds.
- Porous materials – Bone, shell, or wood inlays can absorb vinegar, leading to discoloration and swelling.
- Certain plastics – While most plastics are unaffected by weak acids, some low-quality or older plastics may haze or soften over time.
For items that require absolute precision — like dental tools, optical lenses, or camera parts — even minor chemical etching can degrade performance.
Heat and Concentration: Risk Multipliers
Most ultrasonic cleaners have built-in heaters to improve cleaning efficiency. Heat accelerates chemical reactions, meaning a warm vinegar solution will be more aggressive toward both dirt and base materials. Similarly, higher vinegar concentration increases acidity, making corrosion more likely.
For example:
- Room-temperature vinegar at 5% acidity might take 10–15 minutes to cause visible changes in brass.
- Heated vinegar at 50°C can cause noticeable dulling within just 3–5 minutes.
In practical terms, if you insist on using vinegar for a specific job, you should keep the temperature low and the exposure time short — we will discuss exact handling recommendations in a later section.
When Vinegar Works Well in Ultrasonic Cleaning
Despite the risks, vinegar does have niche uses when paired with ultrasonic cleaning, especially for mineral deposit removal:
- Removing limescale from glass or ceramic labware – Short exposure can dissolve calcium deposits without harming non-reactive surfaces.
- Cleaning stainless steel coffee filter baskets – Limited exposure can break down coffee oils and mineral buildup.
- Brass case reloading in the shooting sports community – Reloaders often use a mix of vinegar, water, and mild detergent for quick tarnish removal, followed by immediate rinsing and neutralization.
In all these cases, the common thread is:
- Short contact time
- Dilution with water (usually at least 1:4 vinegar-to-water ratio)
- Immediate post-cleaning rinse in plain water
- Avoidance of heat during the acid cleaning cycle
Why Professionals Often Avoid Vinegar in Ultrasonic Tanks
Commercial cleaning operations — from jewelers to dental labs — rarely use vinegar directly in their ultrasonic cleaners. The main reasons:
- Tank longevity – Replacement tanks are costly; using acid-free cleaning agents helps maximize service life.
- Material safety – Commercial clients bring in items made from various metals, coatings, and composites, so a universal, non-reactive cleaner is safer.
- Residue and odor – Vinegar leaves a strong smell, which can linger on delicate items or in the tank, requiring extra rinsing.
- Consistency – Proprietary ultrasonic cleaning solutions are formulated to balance pH, surfactants, and corrosion inhibitors for predictable results.
An example from the jewelry industry: The Gemological Institute of America (GIA) advises against household acids in ultrasonic cleaners for most jewelry, recommending only manufacturer-approved cleaning solutions.
In short, while vinegar’s chemistry can be useful in very specific ultrasonic cleaning jobs, its potential to harm both equipment and cleaned items means it should be approached with caution — or replaced with safer alternatives.
How to Use Vinegar Safely in an Ultrasonic Cleaner
If, after weighing the pros and cons, you decide vinegar is worth trying for a specific cleaning task, the key is to control every variable — concentration, time, temperature, and post-cleaning care. Think of it like handling a sharp kitchen knife: incredibly useful, but dangerous if careless.
Step 1: Determine Whether Your Item Can Tolerate Acid
Before vinegar even touches your ultrasonic tank, assess the item you are about to clean. Ask yourself:
- Is it made from or coated with a metal that reacts poorly to acid (aluminum, brass, copper, plated finishes)?
- Does it have natural stones or porous materials (marble, shell, bone, pearl)?
- Are there glued parts, thin protective coatings, or painted surfaces?
- Is the item precision-calibrated, where even microscopic etching could cause issues?
If you answered “yes” to any of the above, vinegar is not a safe option — even for short exposure. Instead, use a neutral pH cleaning solution formulated for ultrasonic use.
Step 2: Prepare a Diluted Vinegar Solution
Full-strength vinegar (5–8% acetic acid) is more likely to cause damage in an ultrasonic environment, so dilution is essential. A commonly used safe-start ratio is 1 part vinegar to 4 parts water (20% vinegar concentration). For very delicate applications, you can reduce to 1 part vinegar to 9 parts water (10% vinegar).
Always mix the solution outside the ultrasonic tank — in a plastic or glass container — before pouring it in. This ensures even dilution and prevents undiluted acid from sitting in one area of the tank, where it could create localized corrosion.
Tip: If your ultrasonic cleaner has a stainless steel tank and you are concerned about long-term acid exposure, use the indirect cleaning method: place your item and vinegar solution inside a smaller glass beaker or plastic container, then set that container in the ultrasonic tank filled with plain water. The sound waves travel through the water into the beaker, cleaning your item without letting vinegar touch the tank directly.
Step 3: Keep the Temperature Low
Acid reactions speed up with heat, so avoid turning on your ultrasonic cleaner’s heater when using vinegar. The ideal temperature range for acid-based ultrasonic cleaning is 20–30°C (68–86°F) — essentially room temperature or slightly warmer. Heated vinegar not only increases corrosion risk but also releases a stronger smell, which can be unpleasant in enclosed spaces.
If you must work in a heated environment (e.g., the room is naturally warm), shorten the cleaning time accordingly.
Step 4: Limit Cleaning Time
The safest approach is to think in minutes, not hours. For most vinegar-based ultrasonic cleaning jobs, 2–5 minutes is more than enough to loosen mineral deposits or tarnish. If the item is still dirty, remove it, rinse thoroughly, and repeat the process rather than running one long cycle.
Longer exposure allows acid to start attacking base materials after the dirt has already been removed — essentially cleaning past the point of benefit.
Step 5: Rinse Thoroughly After Cleaning
The post-cleaning rinse is just as important as the cleaning itself. As soon as the ultrasonic cycle finishes, remove the item and rinse it under a stream of clean water for at least 1–2 minutes. For items with small crevices (like jewelry settings or screw threads), use distilled water and a soft brush to make sure no acidic residue remains.
If the item is made from a metal sensitive to acid, consider neutralizing the surface with a mild alkaline rinse — a teaspoon of baking soda dissolved in a cup of water works well. Follow this with another plain water rinse to remove any baking soda residue.
Step 6: Dry and Inspect
Dry your cleaned item with a soft, lint-free cloth or compressed air. Inspect it under good lighting to ensure no discoloration, pitting, or dull spots have appeared. If you notice any change in surface finish, stop using vinegar immediately for that type of item.
For the ultrasonic tank, drain the vinegar solution promptly after use, rinse the tank with water, and dry it with a soft cloth to prevent any lingering acid from corroding the stainless steel.
Step 7: Handle Odor and Ventilation
Vinegar’s odor is harmless but can be overwhelming in a small space, especially if cavitation releases fine mist into the air. Always use vinegar in a well-ventilated area. If the smell lingers in the tank, fill it with a baking soda and water solution, run a short ultrasonic cycle, then rinse thoroughly.
Step 8: Know When to Stop Using Vinegar
Even if you follow all precautions, repeated acid cleaning will slowly wear down both your items and your ultrasonic tank. Reserve vinegar for occasional, targeted cleaning rather than as your default solution. If you find yourself using it more than a few times a year, it’s worth exploring non-acidic descaling products designed for ultrasonic use — they often work just as well but with less risk.
A Practical Example: Cleaning a Stainless Steel Coffee Filter Basket
Let’s say you have a reusable stainless steel coffee filter that has developed mineral buildup from hard water. Here’s how you could safely use vinegar in your ultrasonic cleaner:
- Mix 100 ml of white vinegar with 400 ml of water in a separate container.
- Pour the diluted solution into a glass beaker and place the filter basket inside.
- Fill your ultrasonic tank with plain water, then set the beaker in the tank.
- Run the cleaner for 3 minutes at room temperature.
- Remove the basket, rinse thoroughly under running water, then dip in a mild baking soda solution for 30 seconds to neutralize acid.
- Rinse again, dry, and inspect.
Following this method, the vinegar never touches the tank directly, the exposure time is short, and the acid is fully neutralized afterward — greatly reducing any long-term risk.
By controlling each variable — from dilution to post-cleaning care — you can use vinegar in an ultrasonic cleaner with minimal danger. But as you’ll see in the next section, there are several alternative cleaning solutions that can achieve similar results without the risks, odors, or corrosion concerns that vinegar brings.
Best Alternatives to Vinegar for Ultrasonic Cleaning
If vinegar feels like a double-edged sword — powerful but potentially damaging — you will be glad to know there are safer, more predictable cleaning solutions designed specifically for ultrasonic use. The right choice depends on what you are cleaning, how often you use your ultrasonic cleaner, and the results you expect.
1. Commercial Ultrasonic Cleaning Solutions
Manufacturers of ultrasonic cleaners and specialty cleaning products have spent decades perfecting formulas that combine detergents, surfactants, and corrosion inhibitors to deliver effective cleaning without harming most materials.
- pH-balanced formulas – These solutions are engineered to be neutral or mildly alkaline, reducing the risk of corrosion.
- Surfactants – Help break down grease and oils, allowing cavitation bubbles to reach the surface more easily.
- Corrosion inhibitors – Protect metals from oxidation during cleaning.
- Material-specific versions – There are solutions designed for jewelry, dental tools, optical lenses, carburetors, and even firearms.
Example: Elma Tec Clean and Branson EC cleaner are widely respected in industrial and jewelry circles for consistent, safe results.
Advantages: Predictable results, safe for ultrasonic tanks, minimal odor.
Drawbacks: Higher cost compared to household products, requires storage space.
2. Mild Dish Soap Solutions
A surprisingly effective and very safe choice for many everyday items is a simple solution of warm water and a few drops of mild dish soap.
- Breaks down oils and light grime through emulsification.
- Safe for most metals, plastics, ceramics, and glass.
- Very low risk of damaging the ultrasonic tank.
For delicate items, choose a fragrance-free, dye-free dish soap like Seventh Generation Free & Clear or Dawn Free & Gentle.
Advantages: Inexpensive, widely available, gentle on materials.
Drawbacks: Less effective on heavy limescale or oxidation; requires thorough rinsing to remove soap residue.
3. Baking Soda Solution (Sodium Bicarbonate)
Baking soda is mildly alkaline and can be used in ultrasonic cleaners for gentle cleaning and light deodorizing.
- Effective on light tarnish, organic residues, and mild odors.
- Non-toxic, odorless, and safe for most materials.
- Can help neutralize acidic residues from prior cleanings.
Recipe: Dissolve 1–2 tablespoons of baking soda per liter of warm water.
Advantages: Extremely safe, inexpensive, environmentally friendly.
Drawbacks: Not effective for removing mineral scale or heavy corrosion.
4. Specialized Descalers (Non-Acid Formulas)
If your primary goal is to remove limescale or mineral deposits, but you want to avoid vinegar’s corrosive risks, look for non-acidic descalers designed for coffee machines or labware.
- Typically based on mild chelating agents like EDTA or citric acid blends balanced with corrosion inhibitors.
- Safe for stainless steel and most sensitive metals.
- Can be used in ultrasonic tanks without pitting risk.
Example: Urnex Clearly Coffee cleaner or eco-friendly citric-based descalers formulated for stainless steel equipment.
Advantages: Strong against mineral buildup but gentle on metal surfaces.
Drawbacks: Slightly more expensive than vinegar; still requires careful rinsing.
5. Isopropyl Alcohol (for Certain Applications Only)
For degreasing metal parts or cleaning electronics (with power disconnected), isopropyl alcohol can be used in an ultrasonic cleaner — but only with careful handling.
- Removes oils, flux residues, and fingerprints quickly.
- Evaporates without leaving water spots.
- Must be used in a well-ventilated area due to flammability.
Important: Never heat alcohol in an ultrasonic cleaner, and avoid using it in open tanks — instead, use the indirect cleaning method with a beaker inside a water-filled tank.
Advantages: Fast drying, excellent for degreasing.
Drawbacks: Flammable, not suitable for plastics that can dissolve in alcohol.
6. Enzymatic Cleaners (For Organic Residues)
Enzyme-based ultrasonic cleaning solutions are ideal for breaking down proteins, fats, and starches — making them popular in medical, dental, and food processing equipment cleaning.
- Contains specific enzymes (protease, lipase, amylase) to target organic matter.
- Safe for most materials, including stainless steel, plastics, and ceramics.
- Works well at moderate temperatures (30–50°C).
Advantages: Excellent for biological residue removal, non-corrosive.
Drawbacks: Limited shelf life; not effective on inorganic deposits like scale.
Comparing the Options
| Cleaning Agent | Best For | Tank Safety | Odor | Material Compatibility |
|---|---|---|---|---|
| Vinegar (Diluted) | Limescale, light oxidation | Medium risk | Strong | Limited – avoid on sensitive metals and stones |
| Commercial Solution | General, material-specific cleaning | Very safe | Mild | Broad |
| Dish Soap | Oils, light dirt | Very safe | Mild to none | Broad |
| Baking Soda | Light tarnish, deodorizing | Very safe | None | Broad |
| Non-Acid Descaler | Mineral buildup | Very safe | Mild | Broad |
| Isopropyl Alcohol | Degreasing, electronics | Safe with beaker method | Mild | Metals, some plastics |
| Enzymatic Cleaner | Organic residues | Very safe | Mild | Broad |
Why Alternatives Often Outperform Vinegar
While vinegar has its place, most of the alternatives above:
- Are non-corrosive, extending the life of your ultrasonic cleaner.
- Provide balanced cleaning chemistry, targeting specific contaminants without harming base materials.
- Have predictable results, which is essential for repeated use in professional or high-value cleaning tasks.
A jeweler, for example, might keep three different solutions on hand — a commercial jewelry cleaner for everyday work, an enzymatic solution for biological contamination (like in pierced earring posts), and a non-acid descaler for stubborn mineral stains. This approach removes the guesswork and eliminates the risks of accidental material damage from vinegar’s acidity.
Deciding Whether to Use Vinegar in Your Ultrasonic Cleaner
By now, you have seen both sides of the story: vinegar is a cheap, familiar cleaner with real descaling power, yet it carries enough risk to make many professionals avoid it altogether. The question is no longer simply “can I use vinegar?” but rather “should I, and if so, under what exact circumstances?”
The right answer depends on three factors:
- What you are cleaning
- How you plan to use the ultrasonic cleaner
- Your tolerance for equipment wear and potential material damage
1. If Your Item Is Acid-Sensitive, Skip Vinegar Entirely
This includes:
- Soft metals like aluminum, brass, and copper
- Plated metals with thin coatings
- Porous natural materials like marble, shell, or bone
- Items with glued parts or organic adhesives
- Any item where surface integrity is critical (optics, precision tools, musical instruments)
For these, vinegar offers no advantage over a neutral or alkaline cleaner, and the risks outweigh any potential gain.
2. If Your Item Is Acid-Resistant and the Problem Is Mineral-Based
Stainless steel, glass, and uncoated ceramics are generally safe with mild acids, provided you control time, temperature, and dilution. If the issue is limescale, soap scum, or other alkaline-based deposits, vinegar can work well as a short-burst solution.
Best practice in this case:
- Use the indirect beaker method to keep vinegar away from the tank.
- Limit exposure to 2–5 minutes at room temperature.
- Follow with thorough rinsing and optional baking soda neutralization.
3. If You Use Your Ultrasonic Cleaner Frequently
The more often you use acid solutions in your cleaner, the greater the cumulative risk to the tank and to your cleaned items. If you run the machine daily or weekly, reserve vinegar for rare, targeted applications, and rely on pH-neutral or mildly alkaline solutions for regular work.
A good rule of thumb: vinegar should not be your “default” ultrasonic cleaner fluid — it should be your specialist tool for specific messes.
4. Equipment Longevity vs. Cleaning Speed
Vinegar can produce visible results quickly, which makes it tempting. But every minute it spends in direct contact with your ultrasonic tank is a small withdrawal from the tank’s lifespan bank account. If you value your equipment and want it to last for years, minimizing acid exposure is the smart play.
Professional cleaning facilities often use indirect cleaning with beakers, baskets, or plastic trays not because they have to, but because it preserves their investment in high-grade ultrasonic tanks.
5. Weighing Alternatives
From Section 4, you saw that baking soda, mild dish soap, and specialized non-acid descalers can often do the same job without the corrosion risks. If you can get 90% of the vinegar’s performance with zero risk, why gamble?
Think of it like taking a sports car to the grocery store — it can do the job quickly, but it’s not the most sensible or sustainable choice.
6. Expert Recommendations
Drawing from guidance provided by:
- Gemological Institute of America (GIA) – Advises against acids in ultrasonic cleaning for jewelry.
- ASM International – Documents accelerated corrosion in stainless steel under acidic, agitated conditions.
- Industrial ultrasonic manufacturers – Branson, Elma, and others recommend pH-neutral or mildly alkaline solutions for most cleaning tasks.
The consensus:
- Use vinegar in an ultrasonic cleaner only for compatible materials and only when necessary.
- Control every variable: dilution, temperature, time, and post-rinse.
- Avoid repeated use to extend equipment life.
Final Thoughts
When handled carefully, vinegar can be an effective, low-cost tool for removing mineral deposits and mild tarnish in an ultrasonic cleaner. But it is far from a universal cleaner, and its risks — corrosion, discoloration, lingering odor — make it unsuitable for everyday use.
The safest path is to treat vinegar as you would a potent spice: something to bring out the best in certain cleaning jobs, but never the main ingredient in your cleaning routine. For most situations, commercial ultrasonic solutions, baking soda mixtures, or mild soaps will deliver safer, equally satisfying results without the risk of turning a quick clean into a costly replacement.
If you decide to use vinegar, let knowledge, not habit, guide your process. That way, every cleaning session ends with a bright, intact item — and a long-lived ultrasonic cleaner ready for the next challenge.