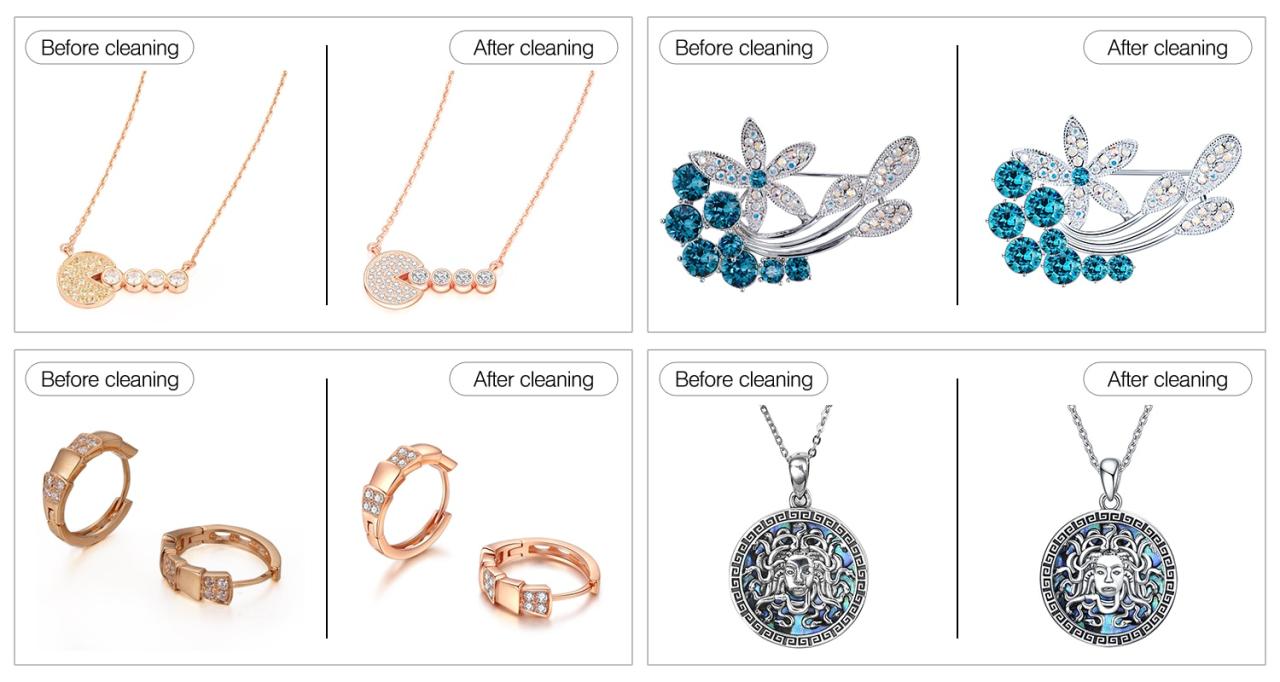
Your favorite necklace might sparkle under the light, but there’s a good chance it’s hiding years of grime you can’t see. Jewelry, especially pieces worn daily like wedding bands, earrings, and bracelets, attract more than just attention—they collect body oils, lotion residue, soap scum, skin particles, and environmental pollutants. Over time, this buildup dulls the brilliance of metals and stones, settling into crevices, underneath prongs, and inside settings too small for even a toothbrush to reach.
Even regular polishing cloths and jewelry wipes can only do so much. While they remove surface fingerprints and restore a temporary sheen, they often push grime deeper into hard-to-reach spaces. For pieces with intricate designs—think filigree, engraved bands, or halo settings—manual cleaning quickly reaches its limit. That’s where ultrasonic cleaning becomes not just convenient, but essential.
The real problem isn’t just dirt. Bacteria can thrive in these unseen corners, especially in earrings or nose rings worn daily. According to a study by the Journal of Environmental Health Research, personal items like rings and watches harbor significant microbial colonies, which can lead to skin irritation or infections over time if not properly cleaned. So, the stakes are more than cosmetic—they’re hygienic too.
Ultrasonic jewelry cleaners step in precisely where hand cleaning fails. They don’t just make jewelry look good; they restore its original cleanliness on a microscopic level. But how exactly do they do that?
Inside the Machine: How Ultrasonic Jewelry Cleaners Actually Work
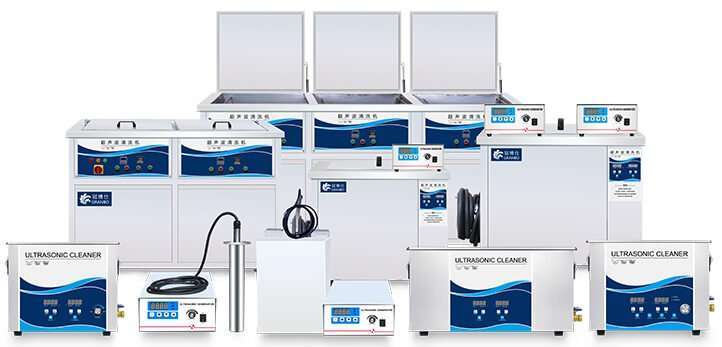
At first glance, an ultrasonic cleaner looks deceptively simple: a small stainless steel tank, a control panel, maybe a digital timer. But inside, it’s doing the work of a thousand tiny brushes—simultaneously and invisibly.
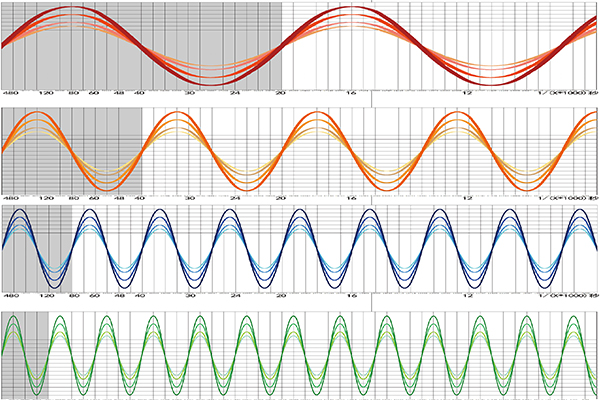
Ultrasonic cleaning works by producing high-frequency sound waves, typically between 20 to 200 KHz. These sound waves pass through the cleaning liquid—usually water or a specialized solution—creating millions of microscopic vacuum bubbles in a process called cavitation. When these bubbles collapse, they release intense energy in the form of micro-jets. It’s this energy that dislodges dirt, oil, and contaminants from surfaces and crevices.
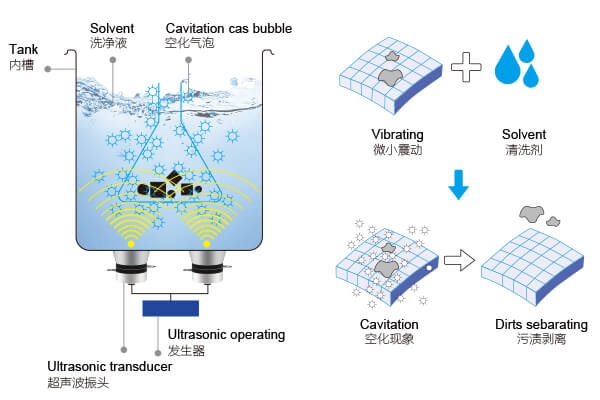
These sound waves are gentle enough not to scratch hard gemstones or damage most precious metals, but powerful enough to penetrate into prong settings, behind clasps, and beneath mounted stones. Unlike traditional cleaning methods, ultrasonic waves don’t rely on friction or abrasion, making them perfect for intricate, delicate jewelry where precision matters.
The beauty of this method lies in its consistency. Every part of the jewelry submerged in the solution is exposed to the same level of cleaning power. There are no missed spots, no “elbow grease” required, and no chance of damaging intricate parts through brushing too hard or using abrasive paste.
It’s also surprisingly quick. Most ultrasonic cleaning cycles last between 2 to 5 minutes, depending on the level of contamination and the specific machine used. That’s all it takes for most items to come out looking almost brand new.
It’s not magic—it’s sound science, quite literally. Ultrasonic energy can penetrate into the tiniest crevices, lifting out contaminants that regular manual cleaning simply can’t reach.
Of course, like any tool, ultrasonic cleaners work best when you use them the right way—and not everything should go in one. But for the right jewelry, used properly, this tool offers results that even professional jewelers trust.
Not All That Glitters Is Ultrasonic Safe: Jewelry Types That Work Best
Ultrasonic jewelry cleaners are powerful, but they’re not universal. While they work wonders on many items, not all jewelry responds well to this kind of deep cleaning. In fact, for some pieces, ultrasonic exposure can be too much of a good thing.
The safest candidates are hard, durable materials. Think of solid gold (especially 14k and 18k), platinum, titanium, stainless steel, and tungsten. These metals can easily withstand cavitation without any risk of etching or wear. Likewise, most natural diamonds, rubies, and sapphires are tough enough for ultrasonic cleaning, particularly when they’re securely set.
But there are exceptions. Some gemstones, even if they appear robust, have vulnerabilities that make them unsuitable for ultrasonic cleaning. Pearls, for example, are highly porous and often held together with adhesives that can degrade in water or heat. Opals, emeralds, lapis lazuli, and malachite are all considered delicate due to internal fractures or chemical instability. Subjecting them to ultrasonic waves may result in cracks, color changes, or complete breakage.
Even diamonds can be tricky if they have internal flaws (known as inclusions) or if they’ve undergone treatments like fracture filling or clarity enhancement. According to the Gemological Institute of America (GIA), ultrasonic cleaning can dislodge fillers or loosen treatments applied to improve a diamond’s clarity or color.
Here’s another nuance: even if the materials are safe, the settings might not be. Pave settings, tension settings, or older prongs may loosen with vibration. If you’re cleaning a vintage ring or anything with delicate mountings, it’s worth inspecting the integrity of the setting beforehand—or checking with a jeweler first.
When in doubt, ask two questions:
- Is the material porous, chemically treated, or heat-sensitive?
- Is the setting secure and modern?
If the answer to either is no, ultrasonic cleaning may not be ideal. But for the vast majority of solid metal and untreated gemstone jewelry, the cleaner is not just safe—it’s incredibly effective.
Ready, Set, Clean: Step-by-Step Instructions for Using an Ultrasonic Jewelry Cleaner
Once you know your jewelry is suitable, you’re ready to use the ultrasonic cleaner the way it was meant to be used: with purpose, precision, and care. The process might seem technical, but it becomes second nature after one or two uses.
Start by choosing the right location. Place the machine on a flat, stable surface near an outlet. Avoid placing it too close to electronic equipment or where splashes could be a problem.
Fill the tank with the appropriate cleaning liquid. This could be distilled water alone, or a mix with a jewelry-specific solution (more on that in the next section). Tap water is not recommended—it can contain minerals that reduce cleaning efficiency and may leave residues on the jewelry.
Most models have a minimum and maximum fill line. Always observe these. Too little water can damage the machine’s transducers, while overfilling risks splashes and poor cavitation.
Now, insert your jewelry into the provided basket or tray. Never place items directly on the bottom of the tank. This is not only harmful to your jewelry but can damage the machine over time. Position pieces so they don’t touch each other. You want full exposure on all sides, not contact that could cause scratches or block cavitation bubbles.
Set the temperature, if your model allows it. For jewelry, the sweet spot is usually 30°C to 40°C (86°F to 104°F). Heat helps soften oils and residues, but going above 50°C (122°F) risks weakening glues or damaging certain gemstones.
Next, select your cleaning cycle duration. For most rings, earrings, and chains, 2–3 minutes is enough. Only heavily soiled items should go longer, and even then, 5 minutes is generally the max. If you’re unsure, start small—you can always run another short cycle if needed.
Hit start, and let the machine work its magic. You’ll see a fine mist or hear a soft hum—that’s cavitation in action. Resist the urge to put your fingers in during operation; the energy isn’t dangerous, but it can feel uncomfortable and interfere with the cleaning process.
When the cycle finishes, remove your items with tongs or gloves, especially if the water is warm. Rinse each piece under clean water to remove loosened debris and detergent residue. Then dry thoroughly with a soft, lint-free cloth. This helps prevent water spots and ensures your jewelry shines immediately.
And that’s it. No scrubbing, no harsh chemicals, and no risk of damaging intricate details. You’ve just cleaned your jewelry more thoroughly than most jewelers can by hand.
Liquid Logic: Choosing the Right Cleaning Solution for Jewelry
Water alone can clean, but it won’t always deliver the kind of sparkle you’re looking for. The real performance of an ultrasonic jewelry cleaner often comes down to what’s in the tank—and not all liquids are created equal.
Start with the basics: distilled water is ideal as a base. Unlike tap water, it’s free from minerals and impurities that could interfere with cavitation or leave a cloudy film on jewelry. But while water alone can remove surface grime, it’s rarely enough for oils, oxidation, or built-up residues in complex designs.
That’s where ultrasonic cleaning solutions come into play. These are specially formulated to amplify the effect of cavitation, usually by breaking down oils, softening dirt, or suspending debris so it doesn’t reattach. There are two major categories: general-purpose solutions and jewelry-specific cleaners.
Jewelry-specific solutions are designed with pH-neutral or mildly alkaline formulas that are safe for gold, platinum, and diamonds. Many also include surfactants or enzymes, which help break down organic materials like skin oil or food particles.
Avoid harsh chemical additions. Never pour bleach, ammonia, acetone, or vinegar into your ultrasonic tank. These substances can damage both your jewelry and your machine. They can also create toxic fumes when vibrated or heated. The U.S. Department of Labor’s Material Safety Data Sheets (MSDS) clearly list ultrasonic exposure as a risk factor for certain volatile chemicals due to aerosolization.
Another mistake is using soap or dishwashing liquid. While they may seem gentle, most soaps are not designed for ultrasonic use. They tend to foam excessively, which interferes with the ultrasonic wave propagation. Foam absorbs energy, reducing the cavitation effect and leading to uneven or ineffective cleaning.
Some high-end cleaners feature separate solution modes for different materials, adjusting cavitation intensity based on the chemical composition. If your machine supports this, always choose the jewelry preset.
If in doubt, use a dedicated jewelry solution from a reputable brand, follow the dilution instructions precisely, and replace the fluid after every few cycles or when it becomes cloudy.
How Long Should Jewelry Stay in the Ultrasonic Cleaner?
More time doesn’t always mean better results. In fact, leaving your jewelry in the ultrasonic cleaner too long can be counterproductive—or even risky.
The average cleaning time for most common jewelry pieces is two to five minutes. This is usually enough to loosen body oils, lotion residue, dust, and other contaminants. Longer durations are generally unnecessary and may start to compromise certain settings or adhesives.
For example, if you’re cleaning a gold ring with a mounted stone, three minutes is usually sufficient. A delicate chain or an earring back that hasn’t been cleaned in years might benefit from five. But going beyond five minutes increases the risk of loosening prongs, weakening solder joints, or even stripping plating on less expensive jewelry.
Professional manufacturers recommend short cycles followed by inspection, rather than long continuous cleaning. This way, you can check for debris removal and decide whether to run another cycle—preferably with clean solution—to finish the job.
Here’s another nuance: heat accelerates cleaning, but also accelerates risk. At higher temperatures, cleaning agents become more aggressive, and cavitation intensifies. That’s great for thick grime—but for delicate stones or vintage pieces, a heated cycle can do more harm than good. If your cleaner has a heater, use it cautiously, especially if you’re cleaning plated or glued items.
And just because something “looks dirty” doesn’t mean it needs a 10-minute bath. Sometimes, contaminants like tarnish or oxidation need chemical treatment before ultrasonic action can remove them. In such cases, use a jewelry-safe tarnish remover before placing the item in your ultrasonic bath.
As a rule of thumb:
- 2 minutes for lightly worn daily jewelry
- 3–4 minutes for more intricate or moderately soiled pieces
- 5 minutes max for stubborn dirt on robust materials like stainless steel or solid gold
Always check your manufacturer’s guide, but if none is provided, these timeframes are a safe place to start. When in doubt, shorter is smarter.
Common Missteps and How to Avoid Them
For all its brilliance and convenience, ultrasonic cleaning is not foolproof. Many users, especially first-timers, make small errors that can dull results or, worse, damage their jewelry or the machine itself. Knowing what to avoid is just as important as knowing how to clean.
One of the most common mistakes is placing jewelry directly on the bottom of the tank. Ultrasonic transducers are usually located at the base, and placing items there interferes with sound wave distribution. Worse, vibrations can cause the metal to repeatedly strike the tank floor, leading to scratches, metal fatigue, or damage to the cleaner. Always use the included basket, tray, or a mesh insert to suspend items off the bottom.
Another frequent error is using tap water instead of distilled. Tap water often contains calcium, magnesium, and chlorine—minerals that reduce cavitation efficiency and can leave deposits on your jewelry. Over time, this residue not only dulls the finish but may also create a cloudy film that’s difficult to remove.
Temperature settings also trip people up. While warm water speeds up the cleaning process, excessive heat can soften adhesives, warp plating, or crack heat-sensitive gemstones like turquoise or opal. Aim for a moderate temperature (around 30–40°C), and don’t let the machine run dry while heating. Some units heat water continuously, so keeping an eye on the temperature during long use is critical.
Then there’s over-cleaning. Yes, your wedding ring might look incredible after its first ultrasonic bath—but that doesn’t mean it needs daily cycles. Repeated ultrasonic exposure can weaken old solder points or loosen settings, especially on antique or handmade pieces. For most items, once every 2–4 weeks is more than enough.
Finally, users sometimes make the mistake of assuming “if it fits, it’s fine to clean.” That mindset leads to tossing in items like glued costume jewelry, electroplated chains, or sensitive vintage pieces. These should never go into an ultrasonic cleaner, no matter how tarnished or dirty they appear. The damage may not be immediate, but adhesive breakdown and color fading often show up hours or days later.
Take it slow, use the right materials, and when in doubt—test with one piece before committing a full set.
Can You Clean Multiple Jewelry Pieces at Once?
Yes, you can clean more than one item at a time—but only if you do it correctly.
Ultrasonic cleaners work best when items are suspended in the solution without overlapping, crowding, or touching. The sound waves that drive cavitation need space to move, and when jewelry pieces touch or pile up, you create “shadow zones” where the waves can’t reach. That results in uneven cleaning—some areas come out sparkling, others stay dull.
More critically, if metals are allowed to rub against each other during vibration, they can scratch, dent, or scuff each other. This is particularly risky with mixed-metal cleaning—say, a sterling silver bracelet resting against a gold-plated pendant. Even minor friction can permanently affect finish quality or cause discoloration.
The safest method is to use a divider tray or soft cloth separators within the basket. Place each item in its own space with a small gap between. Some users go further by placing delicate items in small mesh pouches or zippered bags made specifically for ultrasonic cleaning. These help prevent collisions while allowing full fluid penetration.
If your unit is large enough, you can clean a few rings, earrings, and a chain in one cycle. But be strategic:
- Group items by metal type
- Avoid mixing high-shine pieces with heavily tarnished ones
- Don’t crowd the basket just to save time—it often leads to re-cleaning
If you’re cleaning sets—like a pair of earrings and a matching pendant—it’s usually best to clean them together to ensure consistent brightness and tone.
One final note: after a multi-item clean, rinse each piece individually. This removes residual solution and helps you inspect for missed spots or potential damage. Lay them out to dry separately, never in a pile.
Done right, batch cleaning saves time, energy, and solution. Just remember: space is just as important as time when it comes to ultrasonic efficiency.
How Often Should You Use an Ultrasonic Cleaner on Jewelry?
There’s no one-size-fits-all answer when it comes to how often you should use an ultrasonic cleaner on your jewelry. It depends on how often the piece is worn, what it’s exposed to, and the material itself. That said, there are some general principles that can help guide your schedule.
Start with your most-used items—wedding rings, daily earrings, watches with metal bands. These pieces encounter everything from sweat and lotions to cooking oils and soap residue. For these, cleaning once every two to four weeks is typically ideal. You’ll maintain their shine without overexposing them to vibration or heat.
For items worn less frequently, such as special-occasion jewelry or seasonal pieces, ultrasonic cleaning might only be needed once every few months, or even just once a year before storage. Over-cleaning rarely helps, and in the case of older or delicate items, can sometimes accelerate wear or loosen prongs over time.
Material matters too. While solid gold, platinum, and untreated diamonds tolerate frequent ultrasonic cycles well, silver-plated, rhodium-coated, or glued costume jewelry should be cleaned far less often—if at all. These materials are more susceptible to surface wear, lifting, or chemical damage.
Also consider your lifestyle. Someone who exercises daily or works in healthcare might need to clean jewelry more often due to exposure to sweat, sanitizers, or chemicals. Conversely, someone who removes their rings while cooking, cleaning, or working may not need frequent cycles at all.
Ultimately, ultrasonic cleaning is best viewed as part of a broader jewelry care routine—not a replacement for it. Between ultrasonic sessions, use gentle polishing cloths or non-abrasive wipes to maintain surface shine and remove daily residue. Save the deep clean for when items begin to lose their luster or feel greasy to the touch.
Keeping a simple schedule—perhaps the first weekend of each month for daily wearers—helps ensure consistent care without going overboard.
Caring for the Machine That Cleans: Maintenance Tips
Your ultrasonic cleaner is a precision instrument. Just like any piece of technology, it performs best when it’s taken care of properly. A well-maintained unit delivers stronger cavitation, lasts longer, and ensures your jewelry always comes out looking its best.
The most basic rule is change the solution frequently. After a cleaning cycle, the water may look relatively clear, but it’s likely full of microscopic oils, dirt, and metal particles. Reusing dirty solution not only reduces cleaning power—it can redeposit grime on your next batch of jewelry. As a general rule, change the solution after every 2–3 cycles, or whenever it becomes cloudy.
When it’s time to empty your ultrasonic tank, don’t just pour the liquid down the drain if it contains chemical cleaning agents. Check the instructions for your cleaning solution and follow local disposal rules—this is especially important with stronger, commercial-grade products. Choosing eco-friendly solutions can make the whole disposal process safer and much simpler.
After draining, rinse the tank with clean distilled water and wipe it down with a lint-free cloth. Never use scouring pads or abrasive sponges, which can scratch the inner surface and interfere with future cleaning. Let the tank air-dry fully before refilling.
Keep an eye on the transducers, which are the components responsible for generating ultrasonic waves. They’re usually embedded beneath the tank’s surface, but if your unit ever begins making odd noises or cleaning performance drops, this could signal a malfunction. Regular use of a foil test—placing a small piece of aluminum foil in the tank and running a short cycle—can help assess cavitation strength. If the foil comes out without pitting or holes, your cleaner may not be functioning properly.
If your unit has a heating element, ensure it doesn’t run dry. Heating the tank without sufficient liquid can damage both the heater and transducers. Some advanced units include automatic cutoffs to prevent this—but many consumer-grade models don’t.
Finally, if you’re storing the machine for an extended period, drain and dry it completely, unplug it, and store it in a clean, dust-free environment. Covering it with a soft cloth helps prevent dust buildup on the control panel and tank interior.
Taking care of your ultrasonic cleaner is simple. It doesn’t require special tools or complicated procedures—just routine attention. And in return, it will reward you with years of consistent, professional-quality results.
When to Leave It to the Pros: Knowing Ultrasonic Cleaning’s Limits
Ultrasonic cleaners are powerful tools, but they’re not miracle machines. There are situations where even the best home unit falls short, and knowing when to step back can save your jewelry—and your wallet—from permanent damage.
First and foremost, if your piece holds sentimental or irreplaceable value, it’s worth considering professional cleaning. This includes heirlooms, antique rings, or items with fragile settings or age-worn solder joints. A trained jeweler can not only clean these pieces but also inspect for structural issues like loose prongs or hidden cracks—problems that ultrasonic vibration might worsen if left unchecked.
Certain jewelry materials also require expert handling. Stones like emeralds, tanzanite, amber, and turquoise are often treated with oils or resins to improve their appearance. Ultrasonic cleaning can disrupt or completely remove these treatments, changing the stone’s look forever. Professional jewelers use steam or ionic cleaners that offer greater control and lower risk in such cases.
Then there are pieces with complex mechanical components, such as vintage watches or lockets with hinges. While ultrasonic cleaning can effectively clean watch bands, it’s generally unsafe for the watch head unless it’s specifically rated as waterproof. Internal moisture damage can be devastating—and completely avoidable.
Plated jewelry is another caution zone. Electroplated pieces often have a thin metallic coating that’s vulnerable to peeling or fading when exposed to intense vibration and heat. If your cleaner is strong or runs for too long, you may strip off the very layer that gives the piece its color.
Lastly, if your jewelry includes organic materials like bone, wood, coral, or ivory, ultrasonic cleaning should be avoided. These materials are highly porous and can absorb water, swell, or discolor permanently.
In all of these cases, a professional jeweler brings not only better tools, but also judgment—the ability to identify the safest and most effective cleaning method for each specific piece. Some even offer ultrasonic services in-store, using commercial-grade equipment with precise controls.
So while your home ultrasonic cleaner is a powerful ally, it’s okay to admit when a job is above its pay grade. Professional cleaning doesn’t replace ultrasonic cleaning—it complements it. Think of it like going to the dentist: you brush your teeth every day, but a deep clean now and then keeps things in top shape.
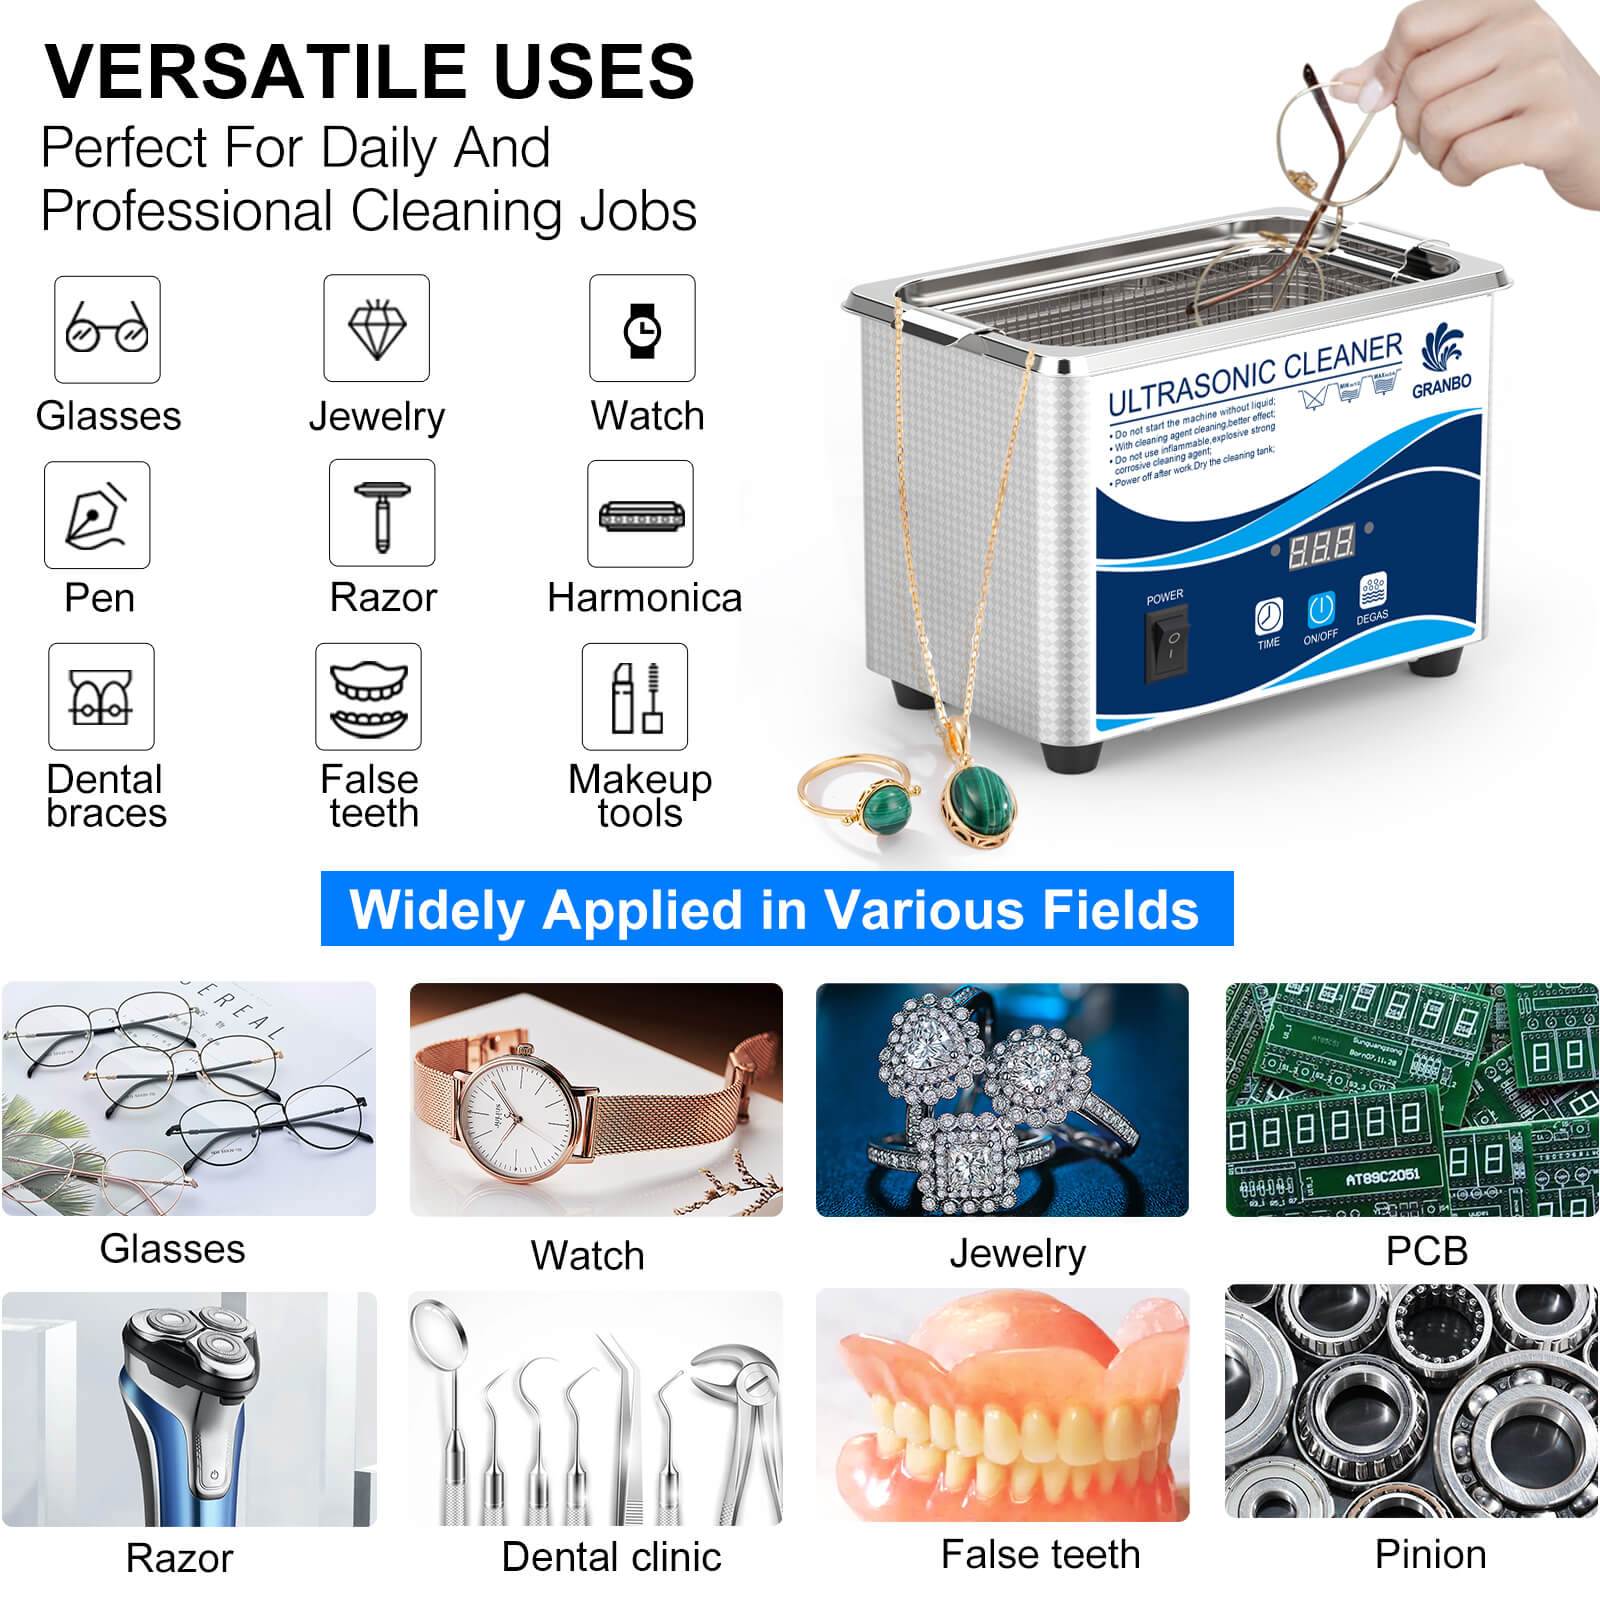
Beyond Jewelry: Other Things You Can Clean in the Same Machine
One of the often-overlooked benefits of owning an ultrasonic cleaner is its versatility. While jewelry is the most popular use case, these machines can safely and effectively clean a wide range of other household and personal items—especially those with intricate designs, crevices, or fine components.

Eyeglasses and sunglasses are ideal candidates. Even if the lenses look clean, grime often collects along the nose pads, inside hinge joints, or at the edge of the frame where skin oil builds up. A short ultrasonic cycle restores clarity and removes skin-contact residues that can cause irritation. Just be sure your lenses aren’t coated with anti-reflective or polarized film that isn’t rated for ultrasonic use—check with the manufacturer.
Watch bands, especially those made of stainless steel, benefit hugely from ultrasonic cleaning. Dirt and sweat trapped between links can lead to odor or even skin rash over time. While it’s safe to clean most metal bands, always remove the watch face or head before cleaning unless it’s water-resistant and specified as safe for ultrasonic cleaning.
Razor heads, dentures, mouthguards, and even toothbrush heads are often recommended for ultrasonic cleaning. These items carry not just dirt, but bacteria. The ultrasonic process doesn’t sterilize, but it does remove debris that harbors microbial growth, making follow-up disinfection with UV or alcohol more effective.
Coins and collectibles—including small metal objects or components—are another common use. Ultrasonic cleaning helps restore surface details without aggressive brushing. Just be cautious with patinated or rare coins, as cleaning can lower their collector value.
Some people even clean small tools, fountain pen nibs, tattoo equipment, and gun parts with ultrasonic baths. The principle remains the same: if it’s made of metal, has tiny parts, and isn’t heat-sensitive, it’s likely a good candidate.
This makes your ultrasonic cleaner more than a jewelry tool—it becomes a multi-purpose hygiene station. With the right cleaning solution and a little care, it can maintain everything from personal grooming tools to collectibles. Just remember: use different cycles and clean the tank between applications to avoid cross-contamination, especially when switching between jewelry and hygiene items.
A Better Way to Shine: What Ultrasonic Cleaning Adds to Jewelry Care
Jewelry isn’t just an accessory—it’s personal. Whether it’s a wedding band worn daily or a necklace passed down through generations, each piece holds meaning far beyond its monetary value. And like anything meaningful, it deserves thoughtful care.
Ultrasonic cleaning brings something unique to the table: efficiency without compromise. It strips away grime you didn’t know was there. It saves time without sacrificing results. And it brings back the kind of sparkle that reminds you why you fell in love with that piece in the first place.
What makes it especially powerful is that it’s accessible. You don’t need a professional’s touch or a jeweler’s lab. With the right machine, a gentle solution, and a few basic precautions, anyone can achieve a level of clean that rivals in-store services.
More importantly, ultrasonic cleaning helps you stay consistent. Instead of waiting for visible tarnish or dirt to accumulate, you can maintain a routine that keeps jewelry looking its best all year round. It becomes less about “fixing” dirty pieces and more about preserving brilliance—like brushing your teeth, but for your favorite accessories.
And the benefits don’t end with jewelry. Glasses, razors, tools, dental gear—an ultrasonic cleaner quickly becomes a staple for caring for the finer things in your life, many of which are otherwise hard to clean properly.
Of course, it’s not a one-size-fits-all solution. Some materials need special handling, some pieces need professional attention, and some days you might just prefer a quick wipe-down. But when used thoughtfully, an ultrasonic cleaner becomes not just a device—but a habit. A quiet part of how you care for what matters.
So whether you’re polishing up heirlooms or just keeping your daily wear in top shape, ultrasonic cleaning offers a better way to shine—cleaner, safer, and smarter.